 Hello, and welcome to this class, where you will learn how to play this amazing instrument called an “Ukulele”. Get the Video Course here: Learn Ukulele as a Complete Beginner
My name is Mike, and I made this class for you, to give you a great foundation for playing this beautiful instrument. You can start as a complete beginner on this instrument, and in only a week or two, be able to play chords and chord progressions to your favorite songs and tunes.
In time if you keep up practicing, you will be able to play chords and rhythms on your ukulele while you sing at the same time. And with more practice you will even be able to add emotion, expression and variation in your performances.
Let’s have a look at the Class Overview:
- The Basics of the Ukulele
- Playing Techniques on the Ukulele
- Practical Tips, Exercises and Examples
- Songs & Tunes on Your Ukulele
In short, you will get many years of joy from this amazing instrument. I warmly welcome you to an amazing adventure in music. Let’s start your journey on the ukulele, right now!
7 Reasons why the Ukulele is so Amazing
This is instrument is beautiful in so many ways, but let me give you my top 7 reasons why the Ukulele is so amazing, and I hope this will give you a spark of motivation and inspiration, to really learn how to play this great instrument:
- Easy to Learn
- Light & Portable
- Minimal Effort
- Perfect for Backing
- Soft & Quiet
- Very Affordable
- Fun & Friendly
5 Ukulele Types
There are actually several sizes and variations of the ukulele. However, I would say 99% of all ukuleles, will be one of the first 3 types: soprano, concert and tenor ukulele. What’s great for you, is that all these 3 variations have the exact same tunings of the strings, which means all notes and chords are the same.
The difference is the size of these ukuleles. Soprano is the smallest, the concert is in the middle, and the tenor is the largest out of these 3. Now even though these 3 ukulele types play exactly the same, meaning all chord shapes, frets and tunings will be the same. The size difference is still important because it changes both the color of the sound, as well as the distance between the frets. I personally play the tenor ukulele, because I felt the soprano ukulele was a bit too tight for my fingers. Most adult hands will struggle with chords on the smallest soprano ukulele, so be aware of that when you choose your instrument.
5 Types of Ukuleles
- Soprano Ukulele
- Concert Ukulele
- Tenor Ukulele
- Baritone Ukulele
- Bass Ukulele
The baritone ukulele is almost a completely different instrument, because it is tuned like the top 4 strings of a guitar, and plays almost like it’s a soprano guitar, and not a ukulele. And finally, the bass ukulele is certainly in a different league, and plays more like a miniature electric bass.
In this class you will learn how to play any of the 3 classic types of ukuleles: soprano (smallest), concert (medium) and tenor (largest). You can choose which one suits you best, depending on the size of your hands and fingers, and what you feel most comfortable playing.
Ukulele Overview
Let’s start with a basic overview of this instrument, and how it works. First, all string instruments, including the ukulele, works by having strings of different length, thickness and tension. Then you create the sound on the instrument by making the strings vibrate. On a ukulele you do this by plucking or strumming the strings. The vibration is then amplified by the hollow instrument body, which acts like a resonance chamber for the sound.
Lower notes are created by longer strings with less tension. And higher pitches are created with shorter strings and higher tension. You change the tension therefore the tuning of any string, by turning the tuning peg for that string to loosen or tighten the tension.
You can change the notes on any string by pressing your finger against it so that it is pushed against one of the frets on the neck. When you go higher up on the neck of the instrument, you are basically shortening the string and therefore play higher notes.
Alright, that is how the ukulele works, now let’s go through all the parts of the ukulele:
The Body
The body of the ukulele is shaped in a similar way as an acoustic guitar. It is hollow like a box, and has a sound hole which acts as an acoustic amplifier. the purpose of the body is to create a resonance chamber that will increase the volume, depth and sustain of the vibrating strings.
The Neck
This is the long part of the instrument which the strings go over, and allows you to press down your fingers on the strings to change which note is played.
The Strings
You have 4 strings on the ukulele, and each one have a different root note for the open string, meaning what note is played when you pluck the string without pressing down a finger on it. These notes are: G, C, E, A, where G is the string closest to your chin when playing.
The Tuners
Each string has its own tuning peg, which you use to either tighten to tune the pitch up, or loosen to tune the pitch down.
The Frets
The ukulele is like the guitar, a fretted string instrument. This means that you have a fretboard below the strings, which you press down the strings against in order to change which note is played. It’s like tiny bars that creates a precise contact point for the strings when you press down the strings. When you play any string on your ukulele, you want to have your finger as close to this fret as possible to get the cleanest sound, but not on top of it.
The Nut
This is the first contact point of the strings, which basically makes it fret number 0. It is like a thick bar that the strings start from. So essentially it is the starting position of each string tuning. The nut is what creates the sound of playing an “open string”, which means you don’t press down a finger on any fret on that string.
The Saddle
Opposite of the nut you will find the end point of each string, which is called the saddle. The distance between the nut and the saddle is essentially the length of each open string.
The Bridge
The saddle sits on the bridge, which is the part that basically holds the strings on the lower end of the instrument. This is the place where you attach new strings when you need to replace them.
Tuning the Strings
Now it’s time to get your ukulele in tune. But first, let me give you an important lesson about strings and tuning. Which is that all strings on all string instruments go out of tune over time. And if you just got your instrument, or put on new strings, it can take many days before the strings settle and they can hold the tuning.
But in any case, tuning strings is something you will have to get used to doing often. You should tune the strings every time you pick up your ukulele for practice or playing. And even within a session, you should check and re-tune whenever you hear that is starts to sound out of tune.
Alright, now let’s learn how to tune your ukulele:
Tuning Tool
The first thing you need is a tuner device, which basically is a tool for recognising the frequency of any sound, like for example a string vibrating after you pluck it. There are external tuner devices you can use, but I personally recommend an app for your smartphone since you always have it on you. Turn on the tuner tool, and place it in front of you so that you can clearly see the display.
Check your Strings
Check what tuning your ukulele strings should be in. The standard ukulele tuning is: G4, C4, E4, A4. This tuning is basically used on all soprano and concert ukuleles, and even many tenor ukuleles. And it is what creates the classic bright and sparkly ukulele sound, because the string closest to your chin is high in pitch. For reference, C4 is the same note as middle C on a piano keyboard.
However, some tenor ukuleles may have what is called a low G tuning, where the G string is thicker, and tuned to G3 instead of G4. So check the specifications of your ukulele and the strings you have on it. In almost all cases it will be tuned: G4, C4, E4, A4…which is standard ukulele tuning.
Pluck & Tune
Start with the string closest to your chin (the G string), and pluck it while watching your tuner. If you have a ukulele with standard tuning on your strings, you should have this string tuned to G4. When you plucked the string so that it vibrates, you turn the tuning peg to either lower the pitch or raise the pitch depending on what your tuner shows. I recommend that you turn the tuner while the string is resonating. Start with the pitch slightly too low, and tune the string upwards. Aim for the perfect pitch of the note, but the ukulele will play in tune as long as the strings are within the “green zone” which usually is around +/- 10 cents of a tone.
Check and Re-Tune
Once you tuned all 4 strings, go back to the first again, and quickly check the tuning one by one. Because when you tune any string, you are changing the tension of the neck and instrument, and the other strings may be out of tune again. So always go back to check and re-tune if needed.
Congratulations – Your Ukulele is in Tune!
What I recommend you to also do as a final step after each time you tune your ukulele, is to play a simple chord to make sure it sounds nice and in tune. So let’s play the easiest chord and most common chord on the ukulele. Press your ring finger down on the 3rd fret of the A string, and then strum all strings downwards with your thumb over the sound hole, and let the notes ring out. Did it sound nice? Great, you just played a C major chord on your ukulele. Alright, now that your ukulele is in tune, you are ready to start practicing and playing your instrument.
Learn How to Strum
Just like on a guitar, one of the main ways to play your ukulele is by strumming the strings in order to play chords.
Downstrokes
You can either strum in a downwards direction, or an upwards direction. When you strum down it is called downstrokes, and you do this with your thumb. Simply start by pressing your thumb against the closest string, and let it run over all strings in a downwards motion.
Upstrokes
When you strum in an upwards direction, it is called upstrokes, and instead of using the back of your thumb I recommend using your index and middle finger when doing upstrokes. It will feel most natural and sound best.
Strumming Rhythm
The way you create rhythm when strumming on your ukulele is to combine down and upstrokes, as well as pauses where you don’t strum. Basically you create a pattern of: upstrokes, downstrokes and pauses, which creates the strumming pattern that is the rhythm.
Practice Session – Strumming in 4/4
What I want you to do now is to practice both strumming downstrokes and upstrokes on your ukulele. To keep things simple let’s not strum any chord, but only the open strings. And practice doing alternating down and upstrokes in a 4/4 rhythm.
Meaning you count 1, 2, 3, 4, 1, 2, 3, 4..and so on, and strum on every beat, switching direction for each strum. Good luck practicing strumming on your ukulele, and I will see you in the next lesson.
Fretting the Strings
What is important to learn straight away on your ukulele, is to fret the strings correctly. This is something many beginners struggle with.
The correct way is to use your finger tips to press down the strings on the specific frets for each note. This means that you angle your fingers downwards so that the finger tips point almost straight down towards the strings.
If you have too much of an angle of your fingers when you press down the strings, it is far too easy to accidentally touch other strings, and you will also loose aim and pressing power.
So make sure to move your hand and wrist upwards and out, so that your finger tips have clear and easy access to the strings and frets.
Notes on Ukulele
Music is based on 12 notes, consisting of 7 main notes which are named from A to G: A, B, C, D, E, F, and G. And then 5 extra notes called “accidentals” which you can see as the black keys on a piano keyboard. These 12 notes repeat both up and down in range, in what is called octaves.
Each of the in between notes (also called accidentals) can be named in 2 ways. They are called sharps or flats. A sharp note is labeled by referencing the note below and going up. And a flat note is labeled by referencing the note above and going down.
So the only difference between flats and sharps in music is simply the reference note they are named after. For example: the black key in between C and D on a piano can either be called C# or Db. And the chord C# Major and Db Major will therefore be exactly the same, using the exact same pattern of notes to play it.
Now of course on a Ukulele you don’t have any black keys that clearly show where these sharps and flats are. But you still need to know that all these accidentals can be named in 2 ways:
- C# = Db
- D# = Eb
- F# = Gb
- G# = Ab
- A# = Bb
Ukulele Fretboard Fingering Chart
I have made this ukulele fingering chart for you, which displays the notes of the ukulele fretboard. You can use it as a reference for playing all the notes for each fret and string. And in time even learn how to find all the notes on the entire ukulele fretboard without using a fingering chart.
Notice that I have chosen to not add the name names for the accidental notes in this fingering chart (meaning the sharps and flats). Because adding them would clutter and make a mess of the fingering chart.
It is also much easier to learn the fretboard if you only focus on the 7 main notes of music. Then to find any sharp or flat, you simply play the fret just below or above one of the main notes from A to G.
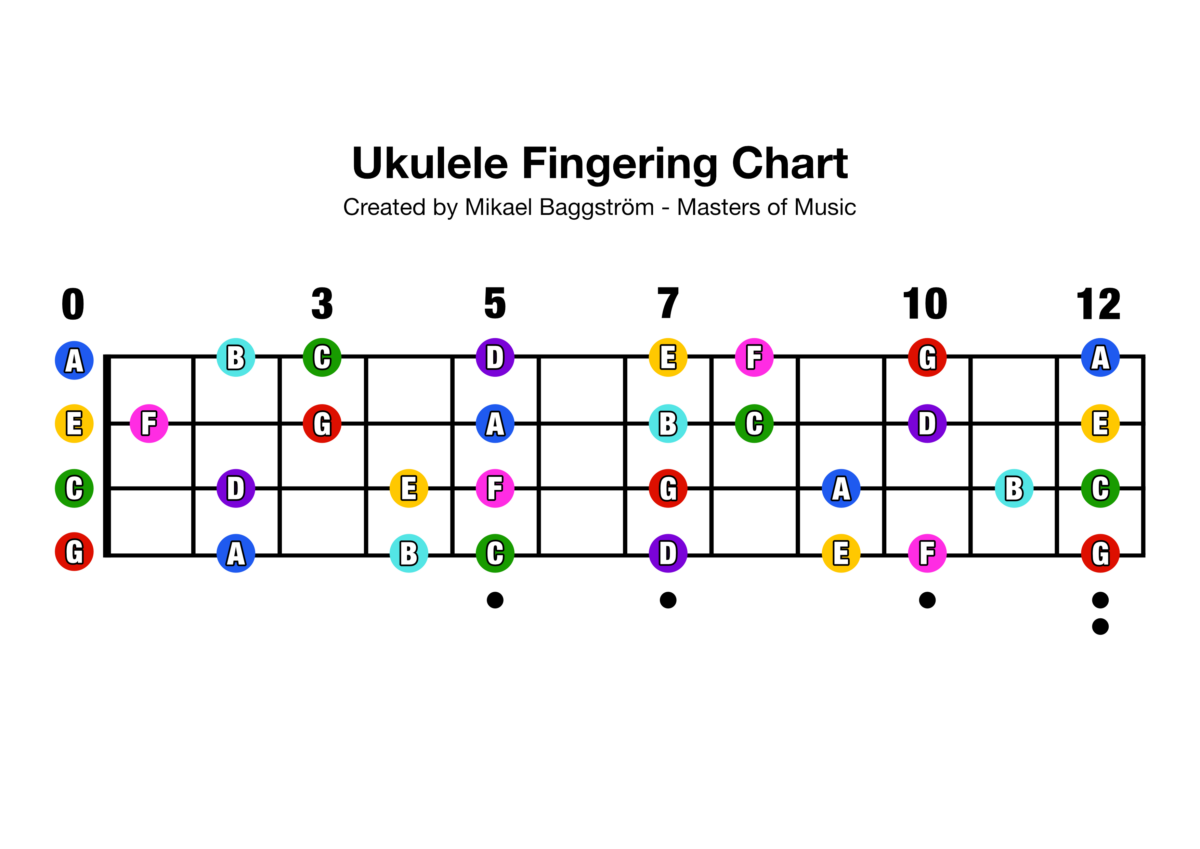
Fretboard Dots
If you check the fretboard of your ukulele you can see that there are these dots on different places on the neck. They are actually there for you as a visual reference, so that you can quickly see which fret you are on, without having to count all the way from the nut.
In most cases you will have dots on fret number: 5, 7, 10, and 12. And since 12 is the number of notes in music, the notes on your ukulele actually starts over at fret 12. Meaning that the 12th fret is the same note as the open string. You can check this yourself by plucking the open string, and then the 12th fret. It is a perfect octave above, meaning the same note but higher up in range.
So use these fretboard dots to your advantage as a visual reference and guide, for quickly finding which fret number you play.
Chords on Ukulele
A chord in music is basically a pattern of notes, that played together create a specific harmonic foundation which has a certain sound, color and emotion. The 2 most common types of chords in music are Major Chords (which sounds happy and uplifting), and Minor Chords (which sounds sad and emotional).
All chords are named from what root note it is based on, followed by what chord type it is. For example: if you start with the note C as the root. You may add E and G to form a C Major chord.
Note Labels
A standard major chord will be labeled as the root note without any extension to the name, for example “C”, is C Major. And a standard minor chord will be labeled with the character “m” as an extension to the root note, or sometimes “min”. So, Cm or C min are both referring to a C Minor chord.
So if you see a chord progression for a song that goes: C – G – Am – Dm – G – C. That means you are going to play the chords: C Major, G Major, A minor, G Major and C Major.
Learning Chords on Your Ukulele
The best way to learn how to play chords is by using chord charts with an illustration of the ukulele fretboard for each chord. Then you can clearly see a dot on each string and fret where you should press down a finger for playing that chord.
If the string should be played open, the dot will be above the nut, also called fret 0. And if the string should not be played at all as part of that chord, it will show an “X” on that string.
Sometimes there is also a line instead of dots, which tells you to put that finger across 2 or more strings at the same time. In this case you should not play with your finger tip, but rather angle down the entire finger on those strings.
Ukulele Chords with Numbers
Another way to describe a chord on ukulele, without using a visual image to illustrate it, is to show the chord shape by using the fret numbers. You already know the tuning of your ukulele strings: G, C, E, A. And you know how to count frets, 0 being the open string, 1 being the first fret etc. Knowing this, you can label a chord by simply writing the fret numbers for each string, starting with the G string and going up.
For example, a C Major chord can be described like this: 0, 0, 0, 3. You read this as playing the first string (G-string) open, because it says 0, which means no fret should be pressed. The same goes for the next 2 strings: C and E. And finally you see the number 3 for the A string. Which means you press down fret number 3 on that string. All together, this creates the shape of a C Major chord.
Your First 3 Chords
Let’s learn 3 of the most common chords on ukulele: C Major, F Major and G Major. In fact, if you only learn these 3 chords, you will still be able to play a lot of songs.
- C Major = 0, 0, 0, 3
- F Major = 2, 0, 1, 0
- G Major = 0, 2, 3, 2
Changing Chords
One of the most tricky aspects of playing a ukulele for beginners, is learning how to change chords. This is because you are simply not used to shaping and aiming your fingers in these unusual positions for the playing chords.
What I always recommend is that you learn and practice all chord changes as slowly and as focused as you can.
Don’t worry about keeping the timing or any rhythm when you start learning to change chords. Make sure to instead be as focused as you can on what you are doing. Start by placing your fingers correctly one by one until you created the full chord pattern, then strum the chord. Then start over with your fingers one by one to shape the next chord, and so on.
When you started to build your muscle memory in your fingers for shaping the specific chords, you can try changing chords by lifting and putting down all fingers at the same time, instead of one by one.
Now practice changing between the 3 chords you already learned: C Major, F Major and G Major. And remember, slow and steady, with focus. That’s how you build your muscle memory.
Chord Rhythm
The great thing about playing chords on any instrument, is that you have complete creative freedom in how you shape the rhythm of the chords, as long as you do the chord changes at the correct places.
What do I mean by this? Well, simply that as long as you switch the chords where you are supposed to according to the chord progression of the song, you can choose how to strum those chords in any rhythm you want. From the most simple which is to only strum each chord once and let it ring until you change chords. To simple up and downstrokes to every beat. All the way to any type of rhythmic pattern of strumming the chords.
Of course, as a beginner you should lean towards the easy mode of rhythmic playing for the chords. Especially if you just started learning a new tune. Keep it as simple as possible, and only advance when you feel comfortable.
Playing your First Song
Now that you have learned how to play 3 chords on your ukulele: C Major, F Major and G Major…let’s use them to play your first song. To keep things simple for you, we will only play the chorus of the song.
This is a very common way to learn songs on your ukulele, where you see the lyrics and then the chords placed on top of the words where you should change the chord. This means that you can still choose what rhythmic pattern you use to strum each chord. So keep it very simple as you start learning the song.
You are my Sunshine (by Johnny Cash)
           C
You are my sunshine, my only sunshine
            F                    C
You make me happy when skies are gray
             F                     C
You'll never know dear, how much I love you
             C       G         C
Please don't take my sunshine away
Congratulations! You have just played your first song on your ukulele. If you want to, you can also start practicing creating different rhythmic patterns for how you strum the chords to the song. And in time, you can even start singing along as you strum the chords on your ukulele.
Now let’s learn some more chords so you can play more songs on your ukulele.
Learn 6 Chords and Play Any Song
I have great news for you, because even though there are many 100s of chords in music, you really only need to learn a few of them to be able to play any song on your ukulele.
Why is this? Well, because practically all songs are written in either a major key or a minor key. Songs in a major key are uplifting and upbeat, and songs in a minor key are emotional and sad.
But here is the kicker: you can always transpose any song up or down in key. Transposing a song means that you move all notes and chords down or up. The song will still sound the same, only the notes and chords will be in a different position, and therefore it will simply sound lower or higher in range.
Furthermore, the C major key and A minor key both have the exact same notes (the white keys on a piano), but with a different root note and root chord. Because C Major and A minor are related to each other.
What does all of this mean for you? Well, basically that you only need to learn the 6 main chords that make up both the C Major key and the A minor key, and then be able to play pretty much any song in the world on your ukulele.
Alright, so let’s learn these 6 Main Chords now:
The 6 Essential Chords on Ukulele
- C Major = 0, 0, 0, 3
- D minor = 2, 2, 1, 0
- E minor = 0, 4, 3, 2
- F Major = 2, 0, 1, 0
- G Major = 0, 2, 3, 2
- A minor = 2, 0, 0, 0
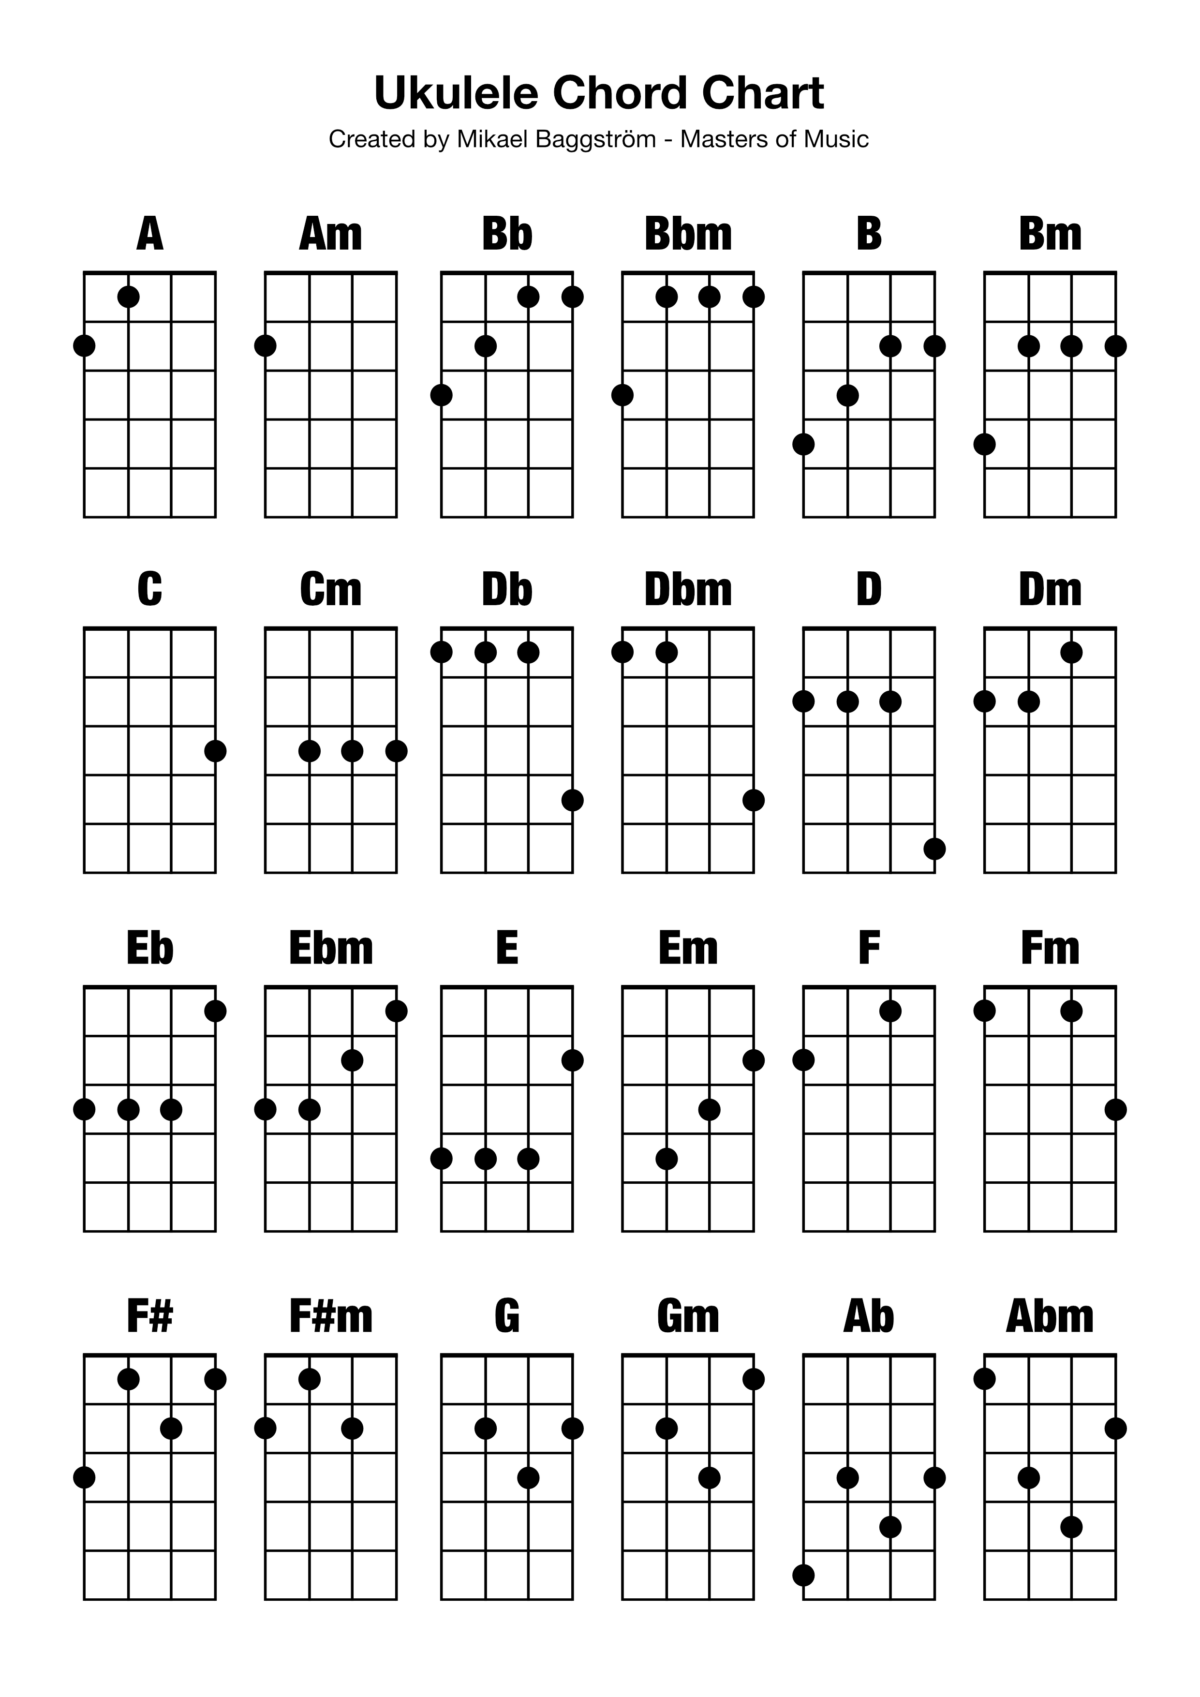
Ukulele Chord Chart
I have made this chord chart for you with all the most common chords for ukulele. You can print it out and use it for reference, and for learning how to play all the main chords on your ukulele.
I also want to recommend a few great tools for learning chords on your ukulele.
