
Your DAW Project Template
Do you want to have an enormous project template in your DAW so that you can simply dive in and compose music?
Great, because today I have the honor to interview Siegfried Schüßler, a professional composer who has created a truly powerful DAW Project Template. First, let’s listen to Siegfried’s amazing music:
1. Hello Siegfried, what is your background & story as a composer?
I have started as a guitar-player and singer in several bands which brought me very fast to the process of composing and recording my own songs. After experimenting with a very modern Tascam 4-Track cassette-recorder and the use of some ping-pong technique-tricks, I have finally discovered the possibilities of working with a DAW which has been very basic at this time.
My first DAW came from a cheap 32 Keys controller and was some sort of Cubase without audio-function. The next step was Cubase VST 24 and later I found out that it was much better using a VST sampler instead of the soundfonts that have been part of the SoundBlaster-card.
Fascinated by the great soundtracks of the golden Hollywood area, like Miklos Rosza (Ben Hur) and the music of Robert Euvino (while playing Caesar III) and Lennie Moore (Outcast), I have created intros and orchestrations for my band projects and got increasingly interested in the world of composing. I have studied musicology and soundtrack-design while digging deeper into musical and technical questions and did a lot of things from meditation-music to game-audio and library-music.
2. What instruments, groups, effects and other things do you add into your massive project template?
To me, it is most important to have a template for the orchestra, because nothing is more complicated than an ensemble of different instruments with lots of playing techniques which have to create a whole sound at once. The classical orchestra is the core of my template.
What I found out was the fact that a collaboration with others can be very complicated when it comes to mixing. On the one hand, you want to create your own listening-mixes or maybe mix it by yourself, while on the other hand you might want to print out stems without any effects or fader-movements. Therefore, I have started with several working-layers as the foundation of my template.
The first layer is a group-track where all sounds of one instrument would be collected. For example, Violin I as keyswitch-version will be routed into it also like multiple tracks of the same instrument with different playing techniques.
No matter what mess will be on my project window, I can create as much tracks of one single instrument I like – they will all end up in being routed in that special group. The same for Violin II and all other instruments. They have their own group-channels which are reserved for only one Instrument each.
These group channels are the base of the first layer of my template. I call it the „Export-Layer“, whose tracks are marked with a special symbol so that they can be easily found within the export-window. This export-layer is not visible and neither the faders are touched nor there will be any insert-or send effects.
The next thing will be the second layer which I call the „Mixing-Layer“. The instruments of layer 1 are routed into them, maybe in groups of High/Low Strings, long/ short Strings, Metal-Percussion, High/Low Woodwinds etc. These tracks are visible only in the mixer window where I can apply inserts, automation and everything else as I like, without interfering with the original signal.
The third and final layer of group-tracks is called „BUS-Layer“ and contains the sum of all major parts like all strings, all woodwinds, all brass etc. There I can also add some final inserts to glue everything together and set the main reverb for all tracks. This layer can be very helpful when a customer wants some special edits like no-vocal-versions, percussion-only or when the editor wants several tracks in order that he would be able to create his own mix or automation.
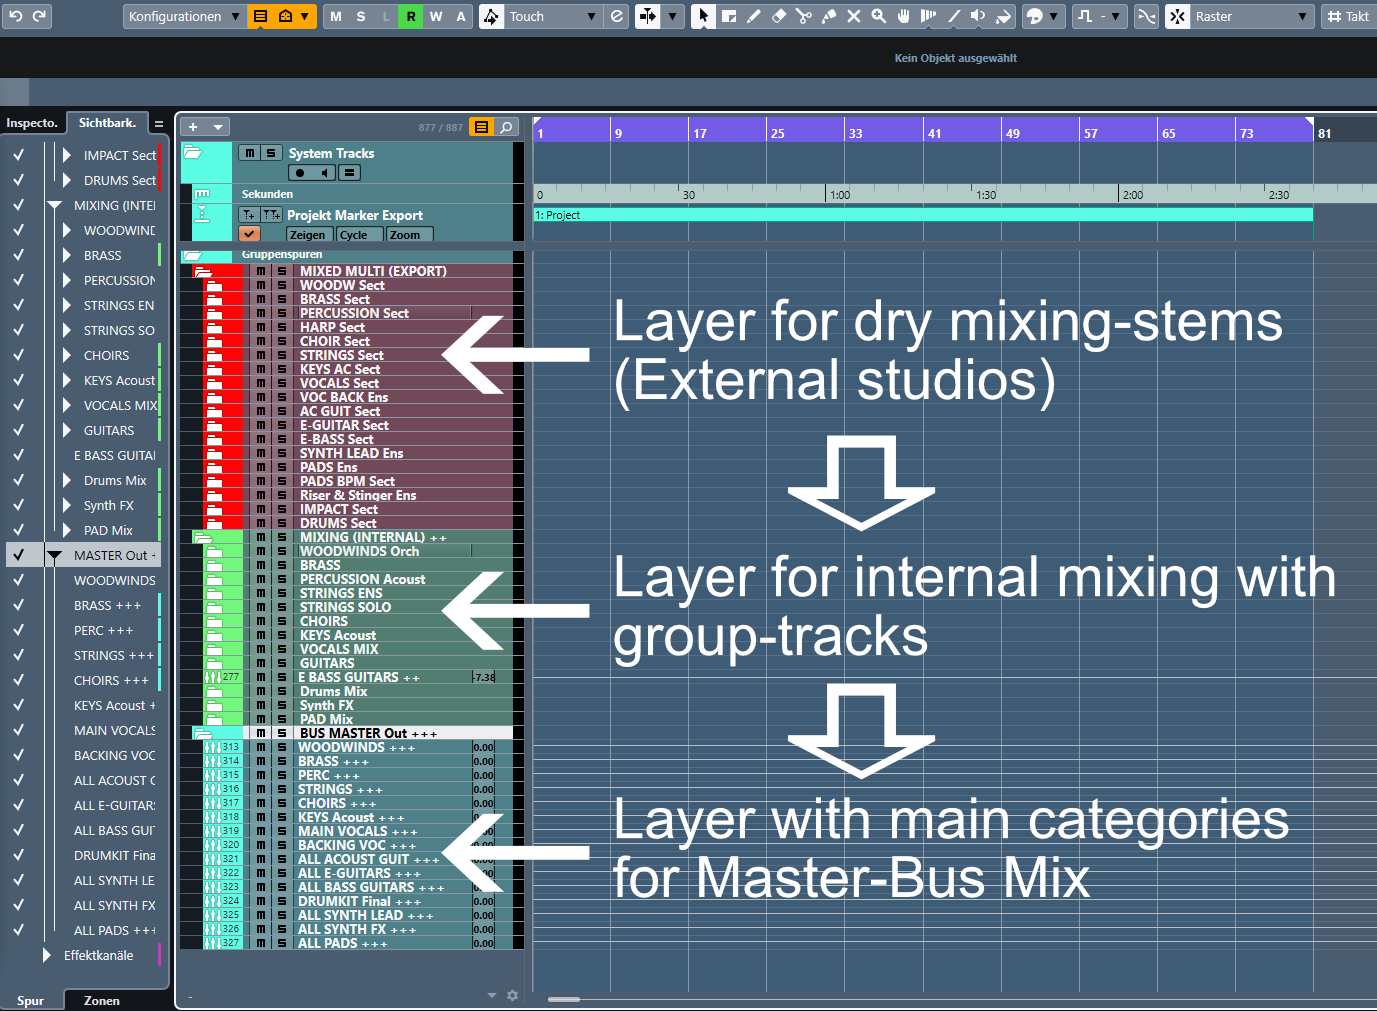
Figure 1 – Three layers of the template: Export – Mix – BUS
Most Instruments in this template are either PLAY or KONTAKT-instances. Then there are two drum modules, Steinberg’s Groove Agent and Superior Drummer. Since I don’t like mixing “in the box” of an VST, the multiple outputs of them are set to the same channel of the first layer.
I treat them as they were acoustic recordings. The Groove-Agent’s outputs are routed to the drum-busses of the dry-mixing-layer and so are the outputs of the Superior Drummer. It is even possible to import acoustic recordings of a real drum-session and just routing them to the same channels, when it comes to replacing the VST by real musicians.
VST-guitars and Bass are also part of this template. Although I am a guitarist, I find it sometimes easier to sketch some ideas with the keyboard or the MIDI-guitar. It is more helpful when changing the right key of the project only with VST-instruments before the recording of the acoustic instruments would start.
When it comes to the use of synths, one VST that every composer should have is the Omnisphere, of course. It’s like a swiss army-knife for sound design with an enormous potential and variety.
Effects are a very important part of my template. In the beginning, the effect-section is disabled by default because I believe that effects might be misleading during the creative process. A good composition should be able to convince even with “bad” sounds. But when it comes finally to using effects, I will activate several reverbs for the sections, one master reverb and a delay.
I have prepared some inserts for the mixing- group- tracks Like EQ and compression and sometimes I use a final glue- compressor in the Bus-mixes. Of course, there are also situations when some effects can have a positive impact on the creativity.
3. How do you control the template once it is done (key commands, apps, CC-controllers etc.)?
I am using multiple ways to control my massive huge composer-template. First, I have created several macros for visibility which will be activated both by key commands and my tablet. On this, there’s an app called „Lemur “.
Touch OSC would be another possible solution. I am sure that this will also work with the Elgato Stream Deck very well, but I haven’t tried that yet. The great advantage of the tablet is the visualization with names and colors and the freedom of configuration.
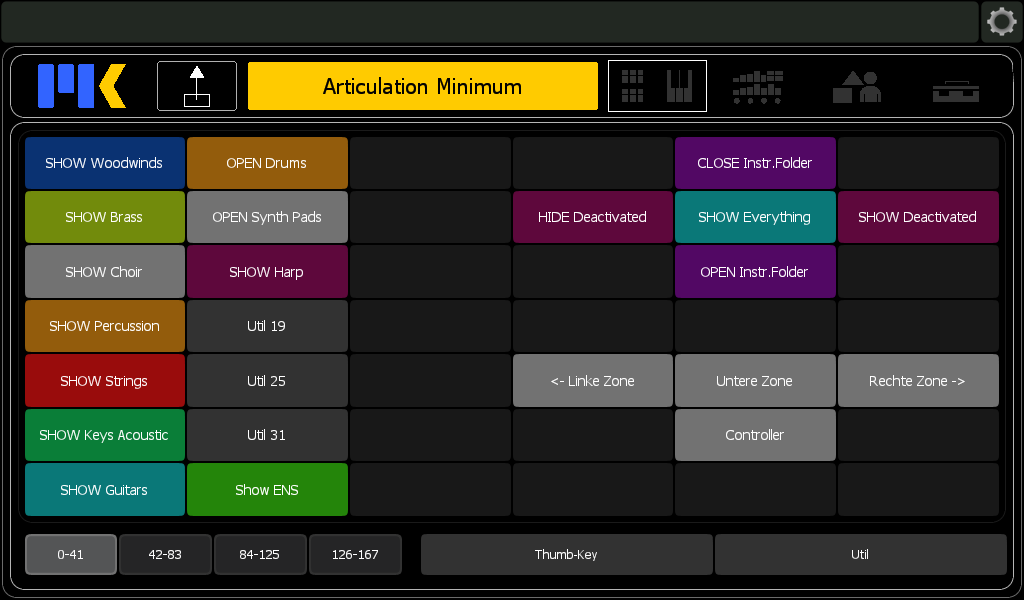
Figure 2 – Screenshot of the visibility-commands on my tablet. Software: Lemur (Liine) and Composer-Tools (Midikinetics)
I also like using gaming-hardware although I am not playing on my studio-DAW. My mouse has 12 programmable side-keys and a mouse wheel with LR-function, so that I am using it for fast for-or backwards while pressing the additional Key in the middle for play/pause.
And the keyboard has customizable key-colors which can be saved together with the mouse settings into customizable and software-related user-profiles. When I start the DAW, there will be different colors and functions than with the notation-software for example.
And, of course I am using standard MIDI-controllers like Alesis VI49 for homework or an M-Audio masterkeyboard together with Korg Pad Kontrol in the Studio. For CC Controllers I am using the tablet with lemur.
4. How do you optimize your template both for workflow and CPU/RAM efficiency?
A lot of DAWs give us the possibility to freeze or disable tracks. Therefore I am using only track instruments instead of MIDI-tracks which would be routed into a multitimbral sampler. Some Kontakt libraries can also easily activate or deactivate the playing techniques directly.
My template is in the very beginning empty without any visible or activated tracks besides the splitted top-window. It contains a set of markers, time signature, tempo and the automation for the master out. This makes it very easy to mark the whole song with one mouse click and having a perfect placed fade out while exporting. When the work starts, I decide which instruments are visible. This also counts for the FX-Section which is also deactivated in the beginning.
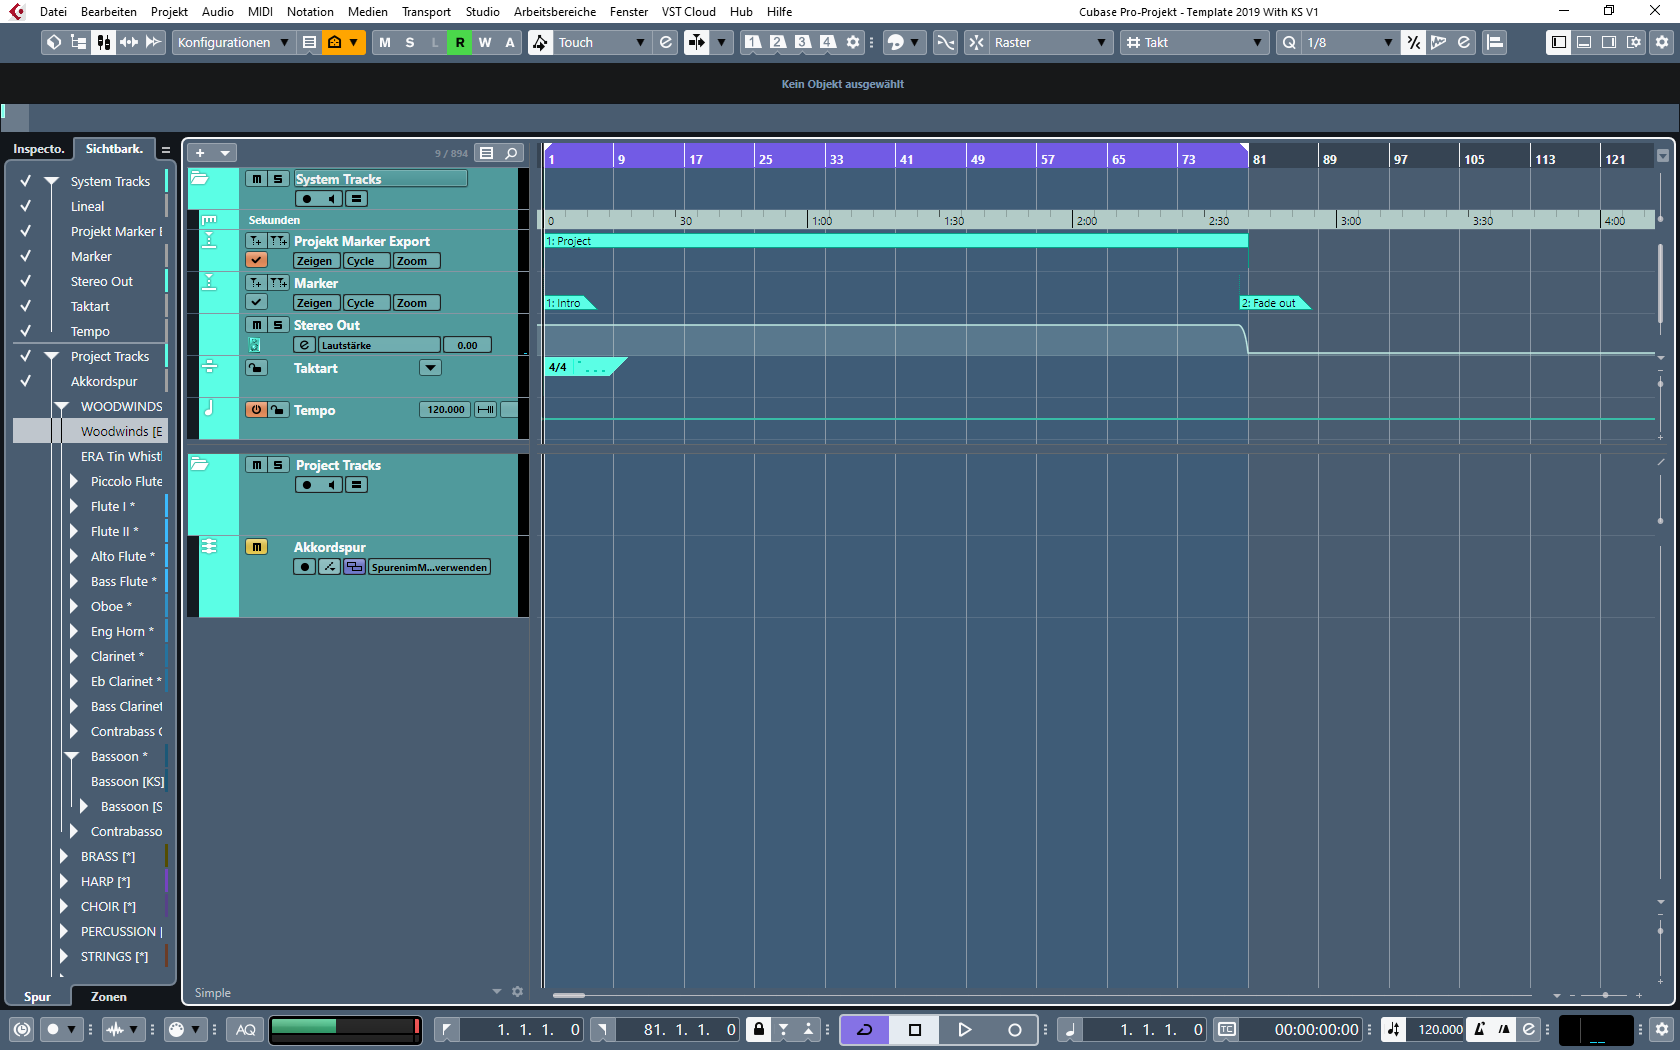
Figure 3- In the beginning, there was an empty template…
For the orchestra, I have next to the keyswitch-instruments also every playing technique as a single track instrument, so that I can only activate staccato strings for example, when I just want to sketch something.
For more complicated classical stuff with lot of changes, I would have to activate the keyswitch-version of the instrument. Most of the time, I don’t use the factory keyswitch-sets, because I love it to use the same expression-map (in Cubase, but in other DAWs there are similar tools) for every instrument section, so that I even don’t need the visualization on the tablet as long as the articulations are set on the same keys.
Therefore, my keyswitch-area starts on C-2, the lowest possible MIDI-note. And I have created custom-ensembles for woodwinds, brass, percussion, strings and choir which are also very helpful for the first steps within the composition process.
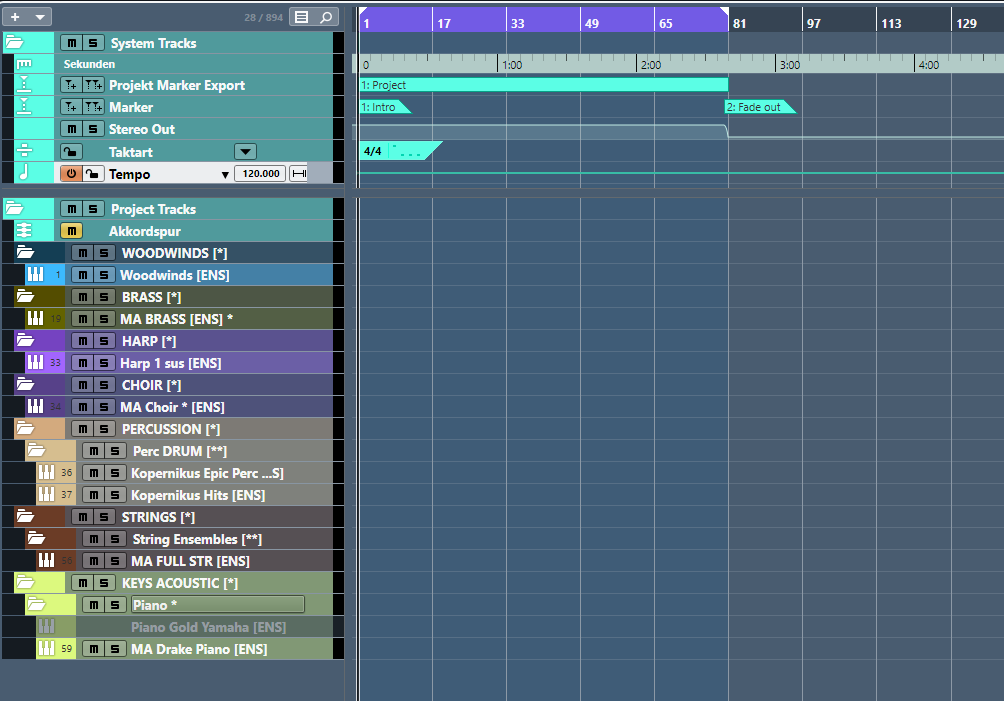
Figure 4 – Ensemble instruments and percussion for fast sketching.
There’s no need to buy ready-made ensemble VSTs when you have already huge libraries like East West or Orchestra Tools.
The keyswitches or different articulations can be chosen for each note individually in the key-editor. This gives me a fast overview of what is going on without interfering with the other controller data.
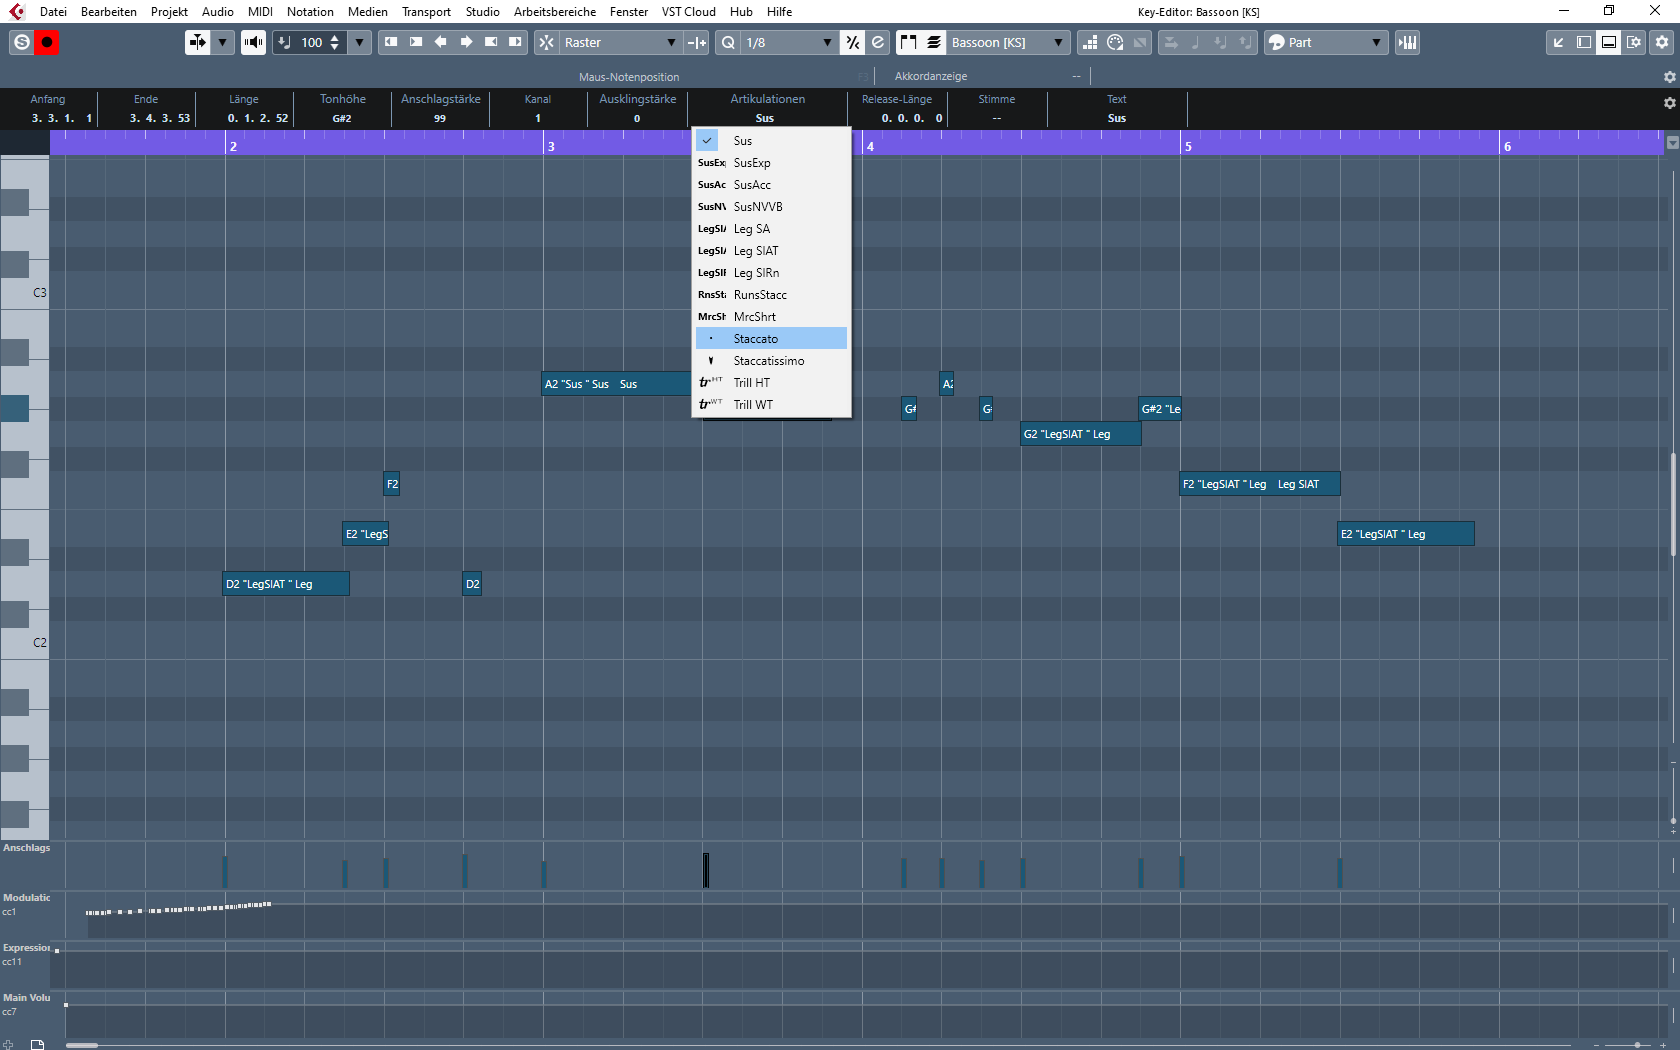
Figure 5 – Articulations (keyswitsches) directly marked in the notes.
I have programmed the visibility agents in a way which brings me in the position of just using one command on my tablet and the template shows only the 5 ensembles for sketching, for example. Or it opens just the folder for percussion.
This keeps the whole thing very fast and RAM-saving and even suitable for mobile work on a laptop. Although my template can be massive and huge, it is also small, flexible and portable because of the exclusive use of track instruments and the disabling-possibilities.
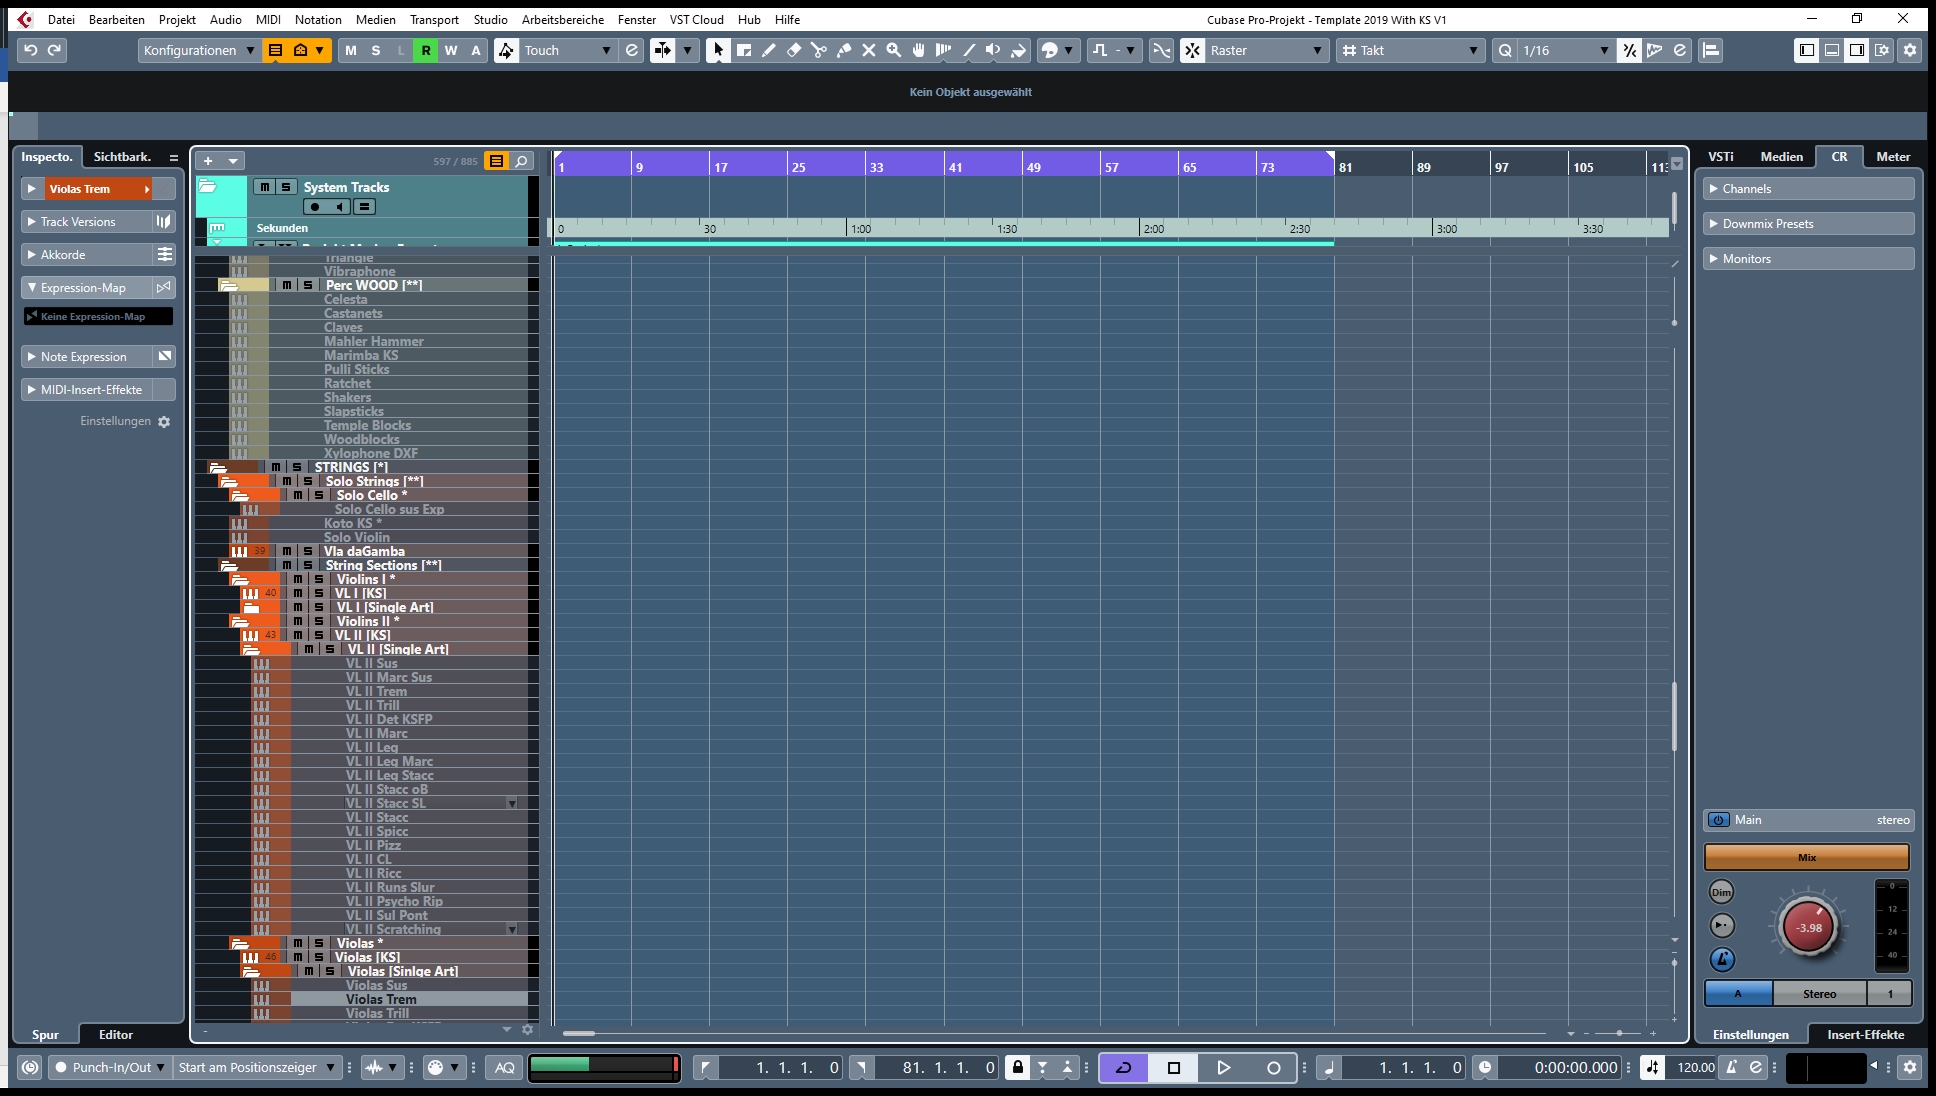
Figure 6- Only a few instruments with multiple playing-techniques on disabled tracks.
One cannot talk about being organized without talking about security. My projects are saved on my One-Drive cloud. For my needs, that’s not only the easiest way to secure my work but also the best solution for switching to a mobile session with my Laptop. Deleted files can be restored within 30 days which gives a great feel of security. Nevertheless, I would recommend using external drives from time to time in addition to the cloud.
5. Any final tips on creating and using a big project template like this?
It is very important to use folders and logical naming conventions. Using brackets for categorization (Violins I [KS] f.e.) will make it very easy to search every track with „[KS]“ in it f.e., especially when using visibility agents.
And I would highly recommend to keep the future in mind. What will you create in the future? How will you prepare the stems for the customer? How much instruments will you include in the future? Good naming and Pictures are also an important factor for a good workflow.
To me, it has always been tempting to create some sort of omnipotent Monster. A template which could cover all styles. The problem is, that you might lose the focus on the one thing that is truly important – creating something. This is why I have included chord-tracks and Ensemble-Instruments for fast sketching. Different colors for the project- and mixer-tracks can be also very helpful to keep a good overview.
6. What plans do you have for the future as a composer?
I will dive deeper into the library-business and the work as game-composer. There is still a lot of things to create besides orchestral and hybrid-music. I even recorded some country songs lately and I will be responsible for the music of an upcoming new female-fronted metal band.
7. Thank you so much for sharing your insights Siegfried, where can people find you online?
Thank you, Mikael, for those great questions and thanks to the readers for your interest. I hope you find these insights useful and you enjoyed the interview. Finding me online is very easy, just visit www.nothung-studios.de and feel free to listen to some of my work or just write me an Email.